Pin
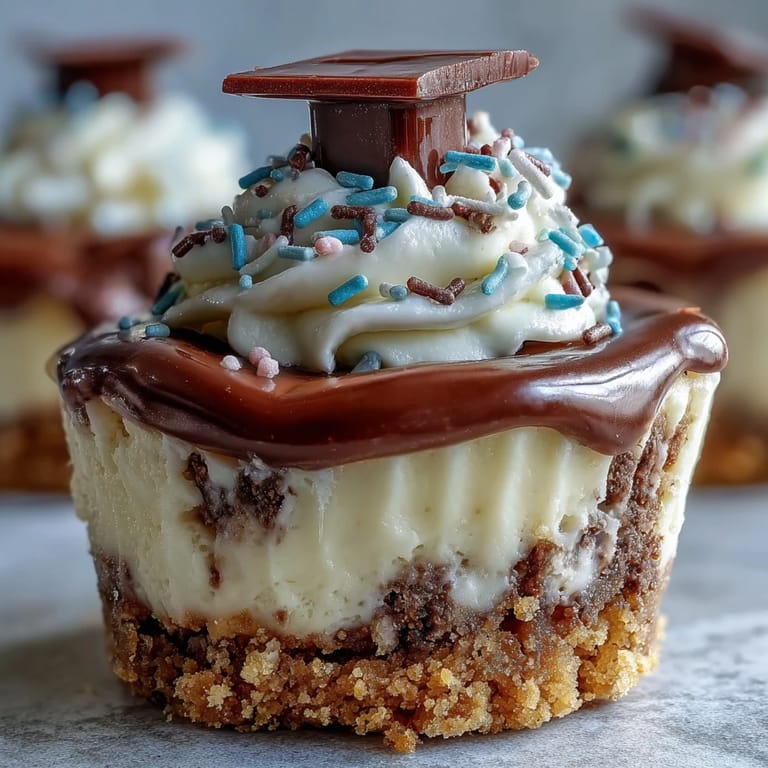
Pin There was a particular weekend, buzzing with excitement and helium balloons, when I first made these cheesecake bites. My kitchen was filled with laughter and the slightly sweet aroma of graham cracker crust baking away. There’s something about transforming humble ingredients into festive little treats that delights even on a busy graduation day. The cheerful toppers turned a simple dessert into the star of the table, and my apron was soon dusted with a fine sprinkle of colored sugar. These bites may look fancy, but they are wonderfully simple — especially with a little music playing and a spare hour in the afternoon.
I still remember prepping these little cheesecakes with my nephew the night before his graduation party. He insisted each one needed a mini chocolate graduation cap, and we debated which sprinkles looked “more celebratory” until the tray could barely fit in the fridge. It’s a great recipe for getting everyone involved — and for adding those small touches that make a party special.
Ingredients
- Graham cracker crumbs: These create the perfect, buttery base; pack them down firmly so they hold together and don’t get crumbly.
- Granulated sugar: Sweetens both your crust and filling; I learned that using just enough in the crust really brings out its toasty flavor.
- Unsalted butter: Melted butter binds the crust and gives it that irresistible richness — don’t skimp on it!
- Cream cheese: Go for full-fat and make sure it’s softened; that’s how you achieve the silky, smooth texture that defines these bites.
- Eggs: Add structure and creaminess; let them come to room temperature for easier mixing.
- Pure vanilla extract: Adds warmth and depth; it really wakes up the flavor of the cream cheese.
- Sour cream: Just a bit adds tang and keeps the filling soft and luscious, which makes a huge difference in bite-sized sweets.
- Salt: Just a pinch to balance out all the sweetness; it’s subtle, but you’d miss it if it was gone.
- Whipped cream (optional): Swirl it on right before serving for a light and airy finish.
- Festive sprinkles or mini chocolate graduation caps: The easiest way to make these feel custom for your celebration; don’t be afraid to get creative.
- Fresh berries: A pop of color and tartness for anyone who likes their cheesecake bites fruity and fresh.
Tired of Takeout? 🥡
Get 10 meals you can make faster than delivery arrives. Seriously.
One email. No spam. Unsubscribe anytime.
Instructions
- Preheat and Prep:
- Start by turning the oven to 325°F (160°C) and lining a mini muffin pan with paper liners; I always double check that every cup is covered so nothing sticks.
- Mix the Crust:
- Stir together the graham cracker crumbs, sugar, and melted butter until the mixture feels like wet sand; it should clump easily when pressed.
- Fill and Bake the Base:
- Spoon about a tablespoon of crust into each liner, press it down with the back of your spoon, and bake for 5 minutes — your kitchen will start to smell warm and inviting.
- Make the Filling:
- With an electric mixer, blend softened cream cheese until smooth, beat in sugar, then add eggs one at a time, blending just until they disappear; stir in vanilla, sour cream, and a pinch of salt until just creamy.
- Fill the Cups:
- Carefully spoon the cheesecake filling over the cooled crusts, filling nearly to the top — these won’t rise much, so don’t be shy.
- Bake Again:
- Bake 13–15 minutes until the centers look set but still wobble a little; overbaking is the enemy of creamy cheesecake.
- Cool and Chill:
- Let the bites cool in the pan for 10 minutes, then carefully lift them to a wire rack before chilling in the fridge for at least half an hour.
- Decorate and Serve:
- Right before your guests arrive, add a dollop of whipped cream, top with sprinkles, chocolate caps, or berries; admire your handiwork before they disappear!
 Pin
Pin We ended up with a tray of cheerful, bite-sized treats that everyone wanted seconds of, but what I really remember is how these cheesecake bites made the room pause — even just for a moment — to appreciate something homemade in the midst of big celebrations.
Decorating For The Occasion
I’ve found that even the simplest decorations make these bites look whimsical and festive. A few minutes spent crafting chocolate mortarboards or picking out the right celebratory sprinkles turns them from quick dessert into the centerpiece of the snack table. Let your imagination — or your grad’s school colors — guide you for a memorable finish.
Make-Ahead Magic
The beauty of this recipe is how easily it welcomes a head start. Make the cheesecakes the night before – they taste even better cold – and save the whipped cream and decorations for just before serving. This leaves you free to actually enjoy your party — and maybe sneak a bite yourself before the rush begins.
Troubleshooting Tiny Cheesecakes
Even small cheesecakes love a gentle touch, so don’t rush the mixing or hot filling. Chill them fully, and don’t skip the paper liners — they really do make serving and cleanup a breeze.
- If you see cracks on top, don’t panic — whipped cream hides everything.
- Forgot the liners? Use a little nonstick spray as backup.
- Let them sit out five minutes before topping so they don’t weep in the fridge.
 Pin
Pin I hope these joyful little cheesecakes bring happy memories to your table and make your next celebration a little sweeter.
Recipe Questions
- → Can these be made ahead?
Yes. Bake and chill the bites up to 24 hours in advance. Store covered in the refrigerator and add whipped cream and sprinkles just before serving to keep toppings fresh.
- → How do I avoid cracks in the filling?
Beat cream cheese until smooth but avoid overworking once eggs are added. Bake until centers are slightly jiggly; residual heat finishes cooking and prevents overbaking that causes cracks.
- → What can I use instead of graham crackers for the crust?
Substitute chocolate cookie crumbs, shortbread, or finely ground digestive biscuits. Adjust the melted butter slightly if cookies are drier to help the crust bind.
- → How can I make these gluten-free?
Use certified gluten-free cookie crumbs for the crust and check all ingredient labels (vanilla extract, toppings) to ensure no cross-contamination.
- → Can these be frozen?
Freeze baked and fully cooled bites in a single layer on a tray, then transfer to an airtight container for up to 2 months. Thaw overnight in the fridge and add fresh toppings before serving.
- → Any tips for festive graduation decorations?
Create mini caps with small chocolate squares and a short licorice knot for the tassel, or use fresh berries and colored sprinkles for an easy celebratory finish.