 Pin
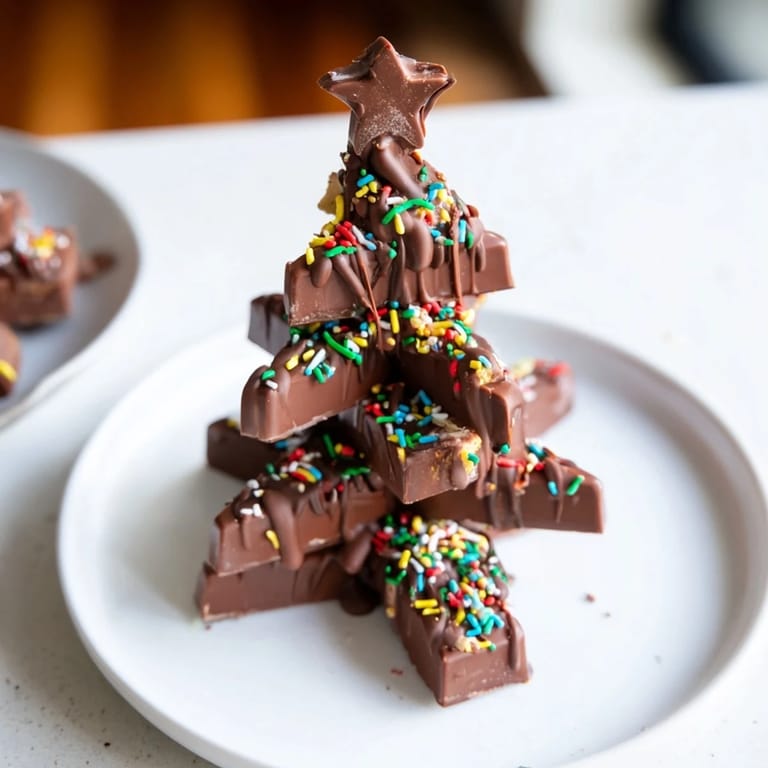
Pin There's something magical about turning chocolate bars into edible trees. My daughter came home from school with this ridiculous idea: stack some Kinder bars, drizzle chocolate, add sparkles, and suddenly we had Christmas decorations you could actually eat. We spent that December afternoon in the kitchen giggling over wobbly stacks and chocolate-covered fingers, and I realized this wasn't just a dessert—it was the exact kind of small, joyful chaos that makes the holidays stick in your memory.
I made a batch the night before our neighborhood cookie exchange, thinking they'd be a fun addition to the dessert table. When I pulled them out of the fridge, a neighbor happened to stop by and literally gasped—turned out she'd been buying similar treats at the fancy chocolate shop downtown for three times the price. That's when I understood: people don't just want good chocolate, they want the story of you making it for them.
Ingredients
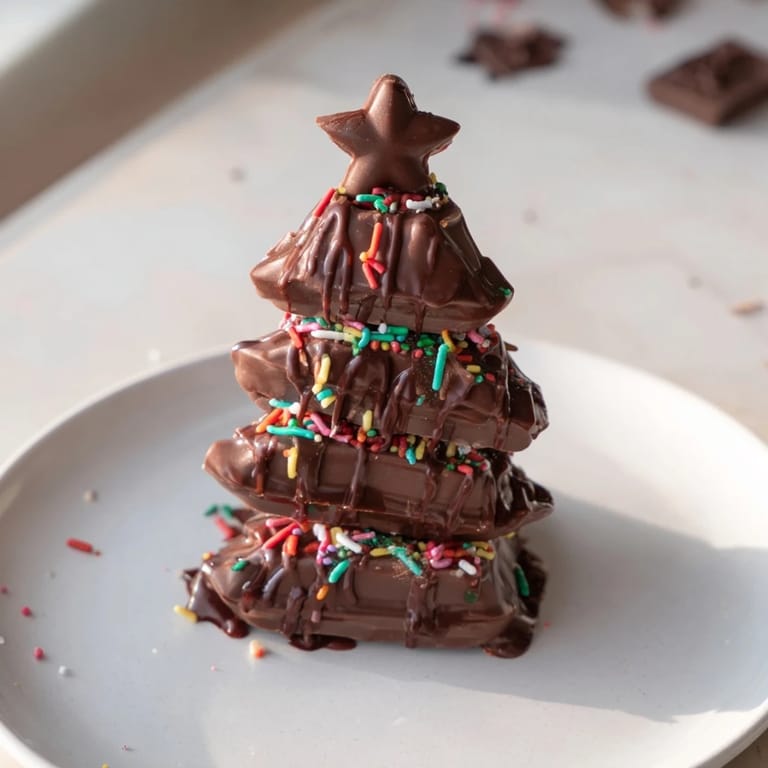
- 24 mini Kinder chocolate bars: These are your building blocks, and their individual wrapper appeal makes them feel more special than breaking up one big bar would. The creamy center is crucial—it's what makes these taste like a real treat, not just decoration.
- 150 g dark or milk chocolate, chopped: Use something you actually enjoy eating on its own, because that taste will carry through. Milk chocolate gives warmth and sweetness; dark brings sophistication.
- 1 tsp coconut oil: This optional ingredient is honestly not optional if you want silky, glossy drizzle that sets beautifully—it prevents the chocolate from getting stiff and clumpy.
- 3 tbsp festive sprinkles or edible glitter: The moment these hit the warm chocolate is what transforms them from snack to celebration, so don't skimp.
- 8 mini chocolate or candy stars: The crowning moment—each tree gets its own little topper, making each one feel intentional and complete.
Tired of Takeout? 🥡
Get 10 meals you can make faster than delivery arrives. Seriously.
One email. No spam. Unsubscribe anytime.
Instructions
- Line your tray like you're setting a stage:
- Parchment paper isn't just for preventing sticking; it's your canvas. Smooth it out so your trees have a clean base to live on.
- Unwrap and arrange your Kinder bars into tree shapes:
- Stack one whole bar at the bottom, break another in half and overlap it slightly to create a triangle, then add one more on top for height. Don't worry if they lean a little—imperfection is part of the charm, and the chocolate drizzle will hold everything together.
- Space them out on the tray:
- Give each tree room to breathe so the chocolate drizzle can flow around it without pooling into a shared puddle with its neighbor.
- Melt chocolate with intention:
- If using a double boiler, let the steam do the work gently—chocolate hates aggressive heat and will seize into a grainy mess if it gets too hot. If using a microwave, go slow with 20-second bursts, stirring between each one. The chocolate oil should make it flow like silk.
- Drizzle with confidence:
- Use a spoon or piping bag to let chocolate cascade down each tree like a winter coating. This is where the magic happens—the chocolate is what ties everything together visually and flavor-wise.
- Decorate immediately while warmth is still your friend:
- Sprinkles need that warm chocolate to stick; add them right away, then crown each tree with a star before the chocolate sets. This is the moment where each tree becomes uniquely yours.
- Chill until set:
- Ten to fifteen minutes in the fridge gives the chocolate time to firm up and locks everything in place. Don't skip this—it's what keeps your creation from turning into a warm, melting situation the moment someone picks it up.
 Pin
Pin My son insisted on bringing a tree to his teacher, wrapped in tissue paper like it was treasure. Watching her face light up made me realize that the most delicious part of cooking is sometimes the moment someone else experiences what you made. These trees became a tradition that year, and now every December I make them without even being asked.
Why Stacking Works Better Than Molding
At first, I thought about melting chocolate into molds to form tree shapes, but the stacking method is better because it's forgiving, faster, and honestly more fun. Each Kinder bar is already the perfect size and shape to nestle against another, and the slight imperfections in alignment are what make them look handmade. Plus, you don't need any special equipment—just your hands and whatever you have in your kitchen.
Chocolate Choice Changes Everything
The chocolate you choose for drizzling is more important than the Kinder bars themselves because it's the final taste someone gets. I've learned that milk chocolate feels cozy and nostalgic, while dark chocolate lends sophistication—and white chocolate, despite what purists say, creates a striking visual contrast if that's your aesthetic. Temperature matters too; melted chocolate that's slightly too cool won't flow, and chocolate that's too hot will slip right off. Aim for warm but not hot, where it moves like water but holds its shape.
Making Them Feel Special
These trees work as edible decorations, party favors, or gifts because they look intentional and celebration-worthy without requiring actual baking skills. The wrapping is your secret weapon—even tissue paper or a small box transforms them from casual snack into something thoughtful. I've also discovered that making them with someone else, whether it's a kid, a friend, or a partner standing nearby, is where the real memory forms.
- Give each person their own tree in a small box tied with a ribbon, and suddenly it feels like an actual gift.
- Set them out on a platter before guests arrive, and watch people genuinely delighted to find a chocolate treat they can pick up and eat.
- Store extras in an airtight container in a cool place, and you'll find yourself reaching for them for days, each bite still tasting like the afternoon you made them.
 Pin
Pin Making chocolate trees taught me that the best festive treats are the ones that feel personal and a little bit imperfect. These live in that sweet spot between simple and special, easy enough to make on a Tuesday but pretty enough to feel like a celebration.
Recipe Questions
- → Can I use other chocolate bars?
Yes, substitute with any mini chocolate bars of similar size to achieve the same stacking effect.
- → What is the best way to melt the chocolate?
Melt chocolate gently over simmering water or in short microwave bursts, stirring frequently for a smooth drizzle.
- → How do I keep the chocolate drizzle smooth?
Adding a small amount of coconut oil while melting helps achieve a glossy, smooth texture.
- → Can kids assist in making these treats?
Absolutely, stacking the bars and sprinkling decorations makes this a kid-friendly activity.
- → How should these treats be stored?
Store in an airtight container in a cool place to keep them fresh for up to one week.