 Pin
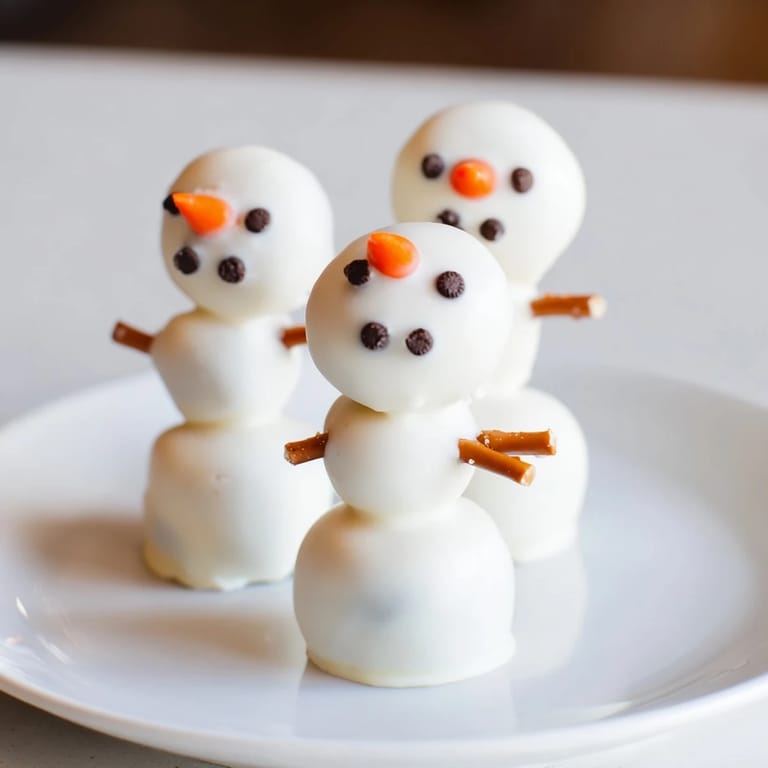
Pin The first time I made these Oreo snowmen, my daughter pressed her nose against the kitchen window on a December afternoon, watching me stack the tiny chocolate balls. There's something magical about turning crushed cookies and cream cheese into a whole winter wonderland on a stick, and when I dipped the first one into melted white chocolate, she actually gasped. That moment reminded me why I love creating food that's as fun to make as it is to eat.
I brought a batch of these to a winter potluck last year, and they were gone within minutes. What surprised me most wasn't that people loved eating them, but how many asked if they could take photos first. They became the centerpiece of the dessert table without me planning it that way.
Ingredients
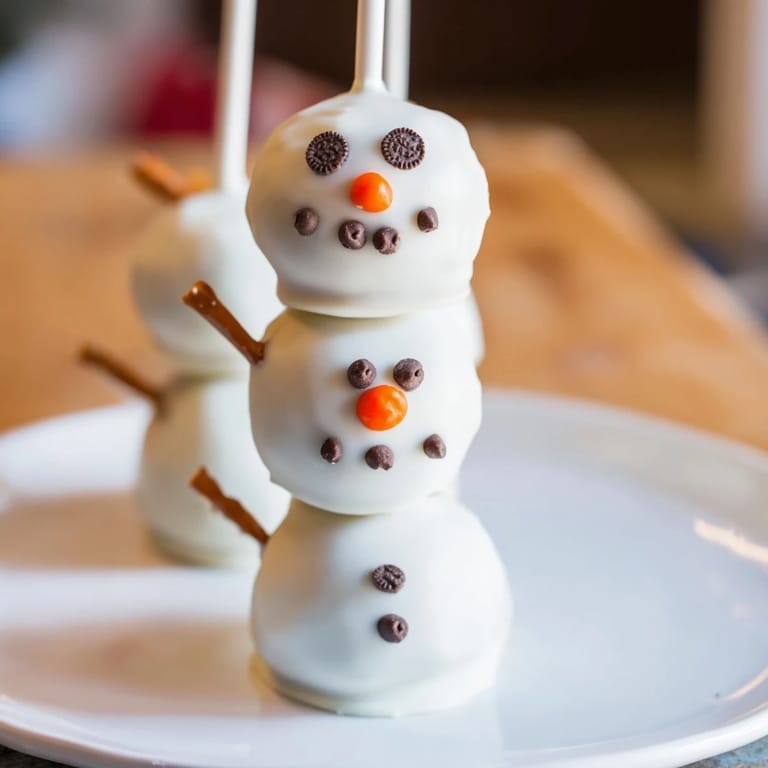
- Oreo cookies: About 36 cookies (one standard package) crushed into fine crumbs, creating the base that makes these snowmen taste like the filling you love most.
- Cream cheese: 180 g softened and mixed with the Oreos until it becomes smooth dough, the ingredient that holds everything together.
- White chocolate or candy melts: 350 g melted to coat each snowman, creating that smooth finish that makes them look professionally done.
- Mini chocolate chips or black decorating gel: For eyes and buttons, whatever you have on hand works perfectly.
- Orange sprinkles or icing: A pop of color for the nose that makes each snowman feel unique.
- Pretzel sticks or colored fondant: Optional arms and scarves that add personality to your finished snowmen.
- Lollipop sticks: The backbone of each snowman, making them easy to hold and dip.
Tired of Takeout? 🥡
Get 10 meals you can make faster than delivery arrives. Seriously.
One email. No spam. Unsubscribe anytime.
Instructions
- Crush and mix:
- Pulse your Oreos in a food processor until they're fine crumbs, then fold in the softened cream cheese until you have a smooth, uniform dough. If you don't have a processor, seal the cookies in a zip-top bag and crush them with a rolling pin.
- Shape the snowballs:
- Roll 32 small balls about 2 cm across and 16 larger balls about 3 cm across. It's okay if they're not perfectly round, snowmen aren't perfect anyway.
- Stack your snowmen:
- Press one small ball gently on top of each large ball, then insert a lollipop stick through both layers. Arrange them on a parchment-lined baking sheet.
- Chill:
- Freeze for 20 to 30 minutes until the snowmen feel firm to the touch. This step is essential so they don't fall apart when you dip them.
- Melt the chocolate:
- Heat your white chocolate in a microwave-safe bowl in 30-second bursts, stirring between each one until smooth and pourable.
- Dip with care:
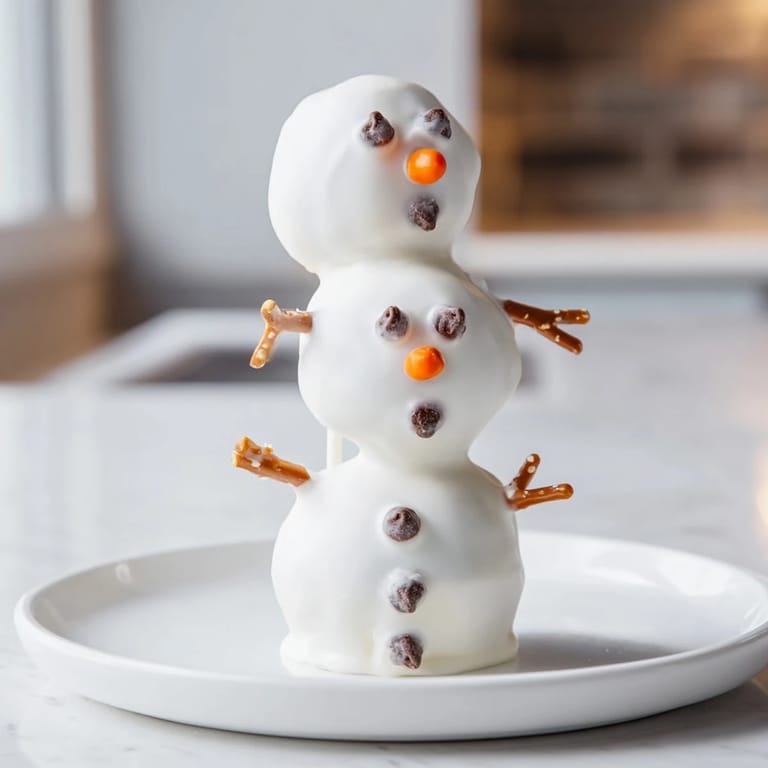
- Gently rotate each chilled snowman in the melted chocolate, letting excess drip back into the bowl, then stand it upright in a styrofoam block or tall glass to set. The white coating should be thick but not lumpy.
- Decorate while wet:
- While the chocolate coating is still slightly tacky, add eyes and buttons with mini chocolate chips or gel, and place a small dab of orange icing for the nose. Work quickly but without pressure.
- Final touches:
- Once everything is set, add pretzel arms and fondant scarves if you'd like them. Your snowmen are ready.
 Pin
Pin The afternoon my nephew arrived for the holidays, the first thing he wanted to do was help me make these. We stood together at the counter, his hands tiny next to mine as we stacked the chocolate balls and dipped them in white coating. He named each one, gave them personalities, and suddenly they weren't just cake pops anymore, they were his creations.
Storage and Keep Fresh
These snowmen will keep in an airtight container in the refrigerator for up to five days, though they rarely last that long in my house. The cream cheese filling keeps them soft inside while the white chocolate shell protects them from drying out. If you're making them ahead for a party, this actually works in your favor.
Making Them Your Own
The beauty of these cake pops is how flexible they are once you understand the basic technique. I've made versions with different fillings, experimented with colored white chocolate, and once even made scarves from thin strips of fondant in every color imaginable. Your kitchen is the only limit here.
Party Prep and Display
These are perfect for holiday parties because you can make them a few days ahead and arrange them on a platter just before serving. They look stunning clustered together, almost like a snow scene on a dessert table. I once arranged mine on a bed of coconut flakes and it looked like they were standing in actual snow.
- Make them two or three days before your party so you're not stressed the day of.
- Stick them in a styrofoam block or tall glass for a simple but impressive display.
- Offer guests the option to add extra toppings so everyone can customize their snowman.
 Pin
Pin These little snowmen remind me that the best recipes are the ones that bring joy twice, first in the making and then in the eating. They're simple enough for an afternoon project but special enough to feel like a gift.
Recipe Questions
- → What ingredients create the snowman shape?
Crushed Oreo cookies mixed with softened cream cheese form a pliable dough that's rolled into small and large balls to shape each snowman.
- → How is the coating applied to the pops?
After freezing, snowman balls are dipped into melted white chocolate or candy melts, ensuring a smooth and even coating.
- → What decorations are used for facial features?
Mini chocolate chips or black decorating gel create the eyes and buttons, while orange sprinkles or icing add the nose.
- → Can the arms and scarves be customized?
Yes, pretzel sticks serve as arms and colored fondant scarves can be shaped and tinted for a festive look.
- → How should these snowman pops be stored?
Keep them in an airtight container refrigerated for up to five days to maintain freshness and texture.
- → Is a food processor necessary for crushing cookies?
If unavailable, Oreo cookies can be crushed in a zip-top bag using a rolling pin to achieve the desired texture.